1) Install apache2
#apt-get install apache2
2) Install php5(atleast 5.4 version for OpenEMR)
#apt-get install php5
check the version of th php installed
#php -v
PHP 5.5.9-1ubuntu4.14 (cli) (built: Oct 28 2015 01:34:46)
Copyright (c) 1997-2014 The PHP Group
Zend Engine v2.5.0, Copyright (c) 1998-2014 Zend Technologies
with Zend OPcache v7.0.3, Copyright (c) 1999-2014, by Zend Technologies
3) Install mysql
#apt-get install mysql-server-5.5
4) Install php5-mysql mysql-client
#apt-get install php5-mysql mysql-client
Modify the php.ini file according to the following
max_execution_time = 60
max_input_time = 90
memory_limit = 128M
display_errors = Off
log_errors = On
register_globals = Off
post_max_size = 30M
file_uploads = On
upload_max_filesize = 30M
error_reporting = E_ALL & ~E_NOTICE & ~E_STRICT & ~E_DEPRECATED
max_input_vars = 3000
extension_mysql = mysql.so
5) download the OpenEMR from sourceforge.
http://sourceforge.net/projects/openemr/files/OpenEMR%20Current/4.2.0.3/openemr-4.2.0.tar.gz/download
6) Extract the tar file
tar -pxvzf openemr-4.2.0.tar.gz
7) Move extracted files to apache web location
mv openemr-4.2.0 /var/www/html/openemr
8) Then after go to the local site that is been deployed
http://localhost/openemr
or
http://{ubuntu-server-ip}/openemr
Follow the screens mentioned in the below link
http://www.open-emr.org/wiki/index.php/OpenEMR_4.2.0_Linux_Installation
Monday, December 28, 2015

Install OpenMRS on Ubuntu 14.04 server
1) Install Java
Download Java from Oracle site
http://www.oracle.com/technetwork/java/javase/downloads/java-archive-javase8-2177648.html
extract the tar file
Install java
After this step type java in terminal if you get "command not found error" then execute following commands based on the location you specified in above step.
#To update java command alternatives
update-alternatives --install "/usr/bin/java" "java" "/usr/local/java/bin/java" 1
#To update javac command alternatives
update-alternatives --install "/usr/bin/javac" "javac" "/usr/local/java/bin/javac" 1
#To udate javaws command alternatives
update-alternatives --install "/usr/bin/javaws" "javaws" "/usr/local/java/bin/javaws" 1
2) Install Tomcat
Download tomcat latest tar file for linux and do the following steps
Extract the tar file.
Move the extracted files to the specific location.
Create Symlink for tomcat files/
Add user for the tomcat
3) Install Mysql
apt-get install mysql-server-5.5
An intermediate GUI appears to provide mysql root user password. Please provide the password and repeat the same password again in the next screen.
4) Download and deploy OpenMRS
http://openmrs.org/download/
download platform war file in the above visited page.
5) Create the properties file in
/usr/local/apache-tomcat-7.0.52/bin/openmrs-runtime.properties
The contents of the properties file should be like
6) Copy the openmrs.war file into tomcat webapps folder.
cp openmrs.war /usr/local/tomcat/webapps/
7) open the browser and go to your local openmrs application.
http://localhost:8080/openmrs
or
http://{Ubuntu-serverip}:8080/openmrs.
8) The initial setup wizard will appear to create the database schema and to load the sample data to the openmrs application. Follow the instructions.
Download Java from Oracle site
http://www.oracle.com/technetwork/java/javase/downloads/java-archive-javase8-2177648.html
extract the tar file
tar -zxvf jdk-7*
Install java
mv jdk1* /usr/local/
ln -s /usr/local/jdk1* /usr/local/java
After this step type java in terminal if you get "command not found error" then execute following commands based on the location you specified in above step.
#To update java command alternatives
update-alternatives --install "/usr/bin/java" "java" "/usr/local/java/bin/java" 1
#To update javac command alternatives
update-alternatives --install "/usr/bin/javac" "javac" "/usr/local/java/bin/javac" 1
#To udate javaws command alternatives
update-alternatives --install "/usr/bin/javaws" "javaws" "/usr/local/java/bin/javaws" 1
2) Install Tomcat
Download tomcat latest tar file for linux and do the following steps
Extract the tar file.
tar -zxvf apache-tomcat-*
Move the extracted files to the specific location.
mv apache-tomcat-* /usr/local/
Create Symlink for tomcat files/
ln -s /usr/local/apache-tomcat-7.0.52 /usr/local/tomcat
Add user for the tomcat
/usr/sbin/adduser tomcat
3) Install Mysql
apt-get install mysql-server-5.5
An intermediate GUI appears to provide mysql root user password. Please provide the password and repeat the same password again in the next screen.
4) Download and deploy OpenMRS
http://openmrs.org/download/
download platform war file in the above visited page.
5) Create the properties file in
/usr/local/apache-tomcat-7.0.52/bin/openmrs-runtime.properties
The contents of the properties file should be like
### Database connection propertiesconnection.username=rootconnection.password=root6) Copy the openmrs.war file into tomcat webapps folder.
cp openmrs.war /usr/local/tomcat/webapps/
7) open the browser and go to your local openmrs application.
http://localhost:8080/openmrs
or
http://{Ubuntu-serverip}:8080/openmrs.
8) The initial setup wizard will appear to create the database schema and to load the sample data to the openmrs application. Follow the instructions.
Request for removal of a page from Google search engine
https://www.google.com/webmasters/tools/removals?pli=1
https://support.google.com/webmasters/answer/63758
https://support.google.com/webmasters/answer/63758
Friday, December 25, 2015
Openclinica 3.8 installation on ubuntu 14.04 server
This week we worked on installing Openclinica for one of our client. The wiki page gives detailed steps but some things need to be added to that.
Here I am going to give detailed steps. Most of the steps copied from the wiki page.
1) The prerequisites are
ubuntu machine with following softwares installed
vim
unzip
tar
You require "root" user access. Run all commands in the installation instructions using root-level permission.
2) Install Java
Openclinica is based on Java.
Then you need to update the alternatives by following commands
#To update java command alternatives
update-alternatives --install "/usr/bin/java" "java" "/usr/local/java/bin/java" 1
#To update javac command alternatives
update-alternatives --install "/usr/bin/javac" "javac" "/usr/local/java/bin/javac" 1
#To udate javaws command alternatives
update-alternatives --install "/usr/bin/javaws" "javaws" "/usr/local/java/bin/javaws" 1
3) Install tomcat
Here I am going to give detailed steps. Most of the steps copied from the wiki page.
1) The prerequisites are
ubuntu machine with following softwares installed
vim
unzip
tar
You require "root" user access. Run all commands in the installation instructions using root-level permission.
2) Install Java
Openclinica is based on Java.
#Create folder if it doesn't exist
mkdir -p /usr/local/oc/install
#Change to this folder:
cd /usr/local/oc/install
#Download jdk into the above folder
#find the 32-bit version here: https://openclinica.app.box.com/oc-downloads/1/2186650849
#find the 64-bit version here: https://openclinica.app.box.com/oc-downloads/1/2186651363
#Install Java by running:
tar -zxvf jdk-7*
#Install Java in the operating system by running:
mv jdk1* /usr/local/
ln -s /usr/local/jdk1* /usr/local/java
After above steps test java installed by typing java and javac. If the command not found error occurs.
Then you need to update the alternatives by following commands
#To update java command alternatives
update-alternatives --install "/usr/bin/java" "java" "/usr/local/java/bin/java" 1
#To update javac command alternatives
update-alternatives --install "/usr/bin/javac" "javac" "/usr/local/java/bin/javac" 1
#To udate javaws command alternatives
update-alternatives --install "/usr/bin/javaws" "javaws" "/usr/local/java/bin/javaws" 1
3) Install tomcat
#Create folder if it doesn't exist
mkdir -p /usr/local/oc/install

#Change to this folder:
cd /usr/local/oc/install

#Download tomcat into the above folder
wget https://dev.openclinica.com/oc/software/OpenClinica-3.2/linux/apache-tomcat-7.0.52.tar.gz

#Install Tomcat by running the following:
tar -zxvf apache-tomcat-*
mv apache-tomcat-* /usr/local/
ln -s /usr/local/apache-tomcat-7.0.52 /usr/local/tomcat
/usr/sbin/adduser tomcat

#Update the File Path parameter to the correct value
chown -R tomcat /usr/local/tomcat/*
chown -R tomcat /usr/local/apache-*
4) Install PostgreSql
We have installed postgresql 9.3. Observed that 8.4 does not work with OpenClinica 3.8.
#Install postgresql
apt-get install postgresql
Then enter into the database to create a role and database for the openclinica.
# to connect to the localhost psql
psql -U postgres
If you get following error
psql: FATAL: Peer authentication failed for user "postgres"
then
#Edit the /etc/postgresql/9.1/main/pg_hba.conf
local all postgres peer
Should be
local all postgres md5
And restart the postgresql service
service postgresql restart
sudo -i -u postgres
psql
If you get following error
psql: FATAL: Peer authentication failed for user "postgres"
then
#Edit the /etc/postgresql/9.1/main/pg_hba.conf
local all postgres peer
Should be
local all postgres md5
And restart the postgresql service
service postgresql restart
sudo -i -u postgres
psql
#Enter the password that is given at the time of installation
#Create role clinica with password clinica
CREATE ROLE clinica LOGIN ENCRYPTED PASSWORD 'clinica' SUPERUSER NOINHERIT NOCREATEDB NOCREATEROLE;
#Create database openclinica
CREATE DATABASE openclinica WITH ENCODING='UTF8' OWNER=clinica;
#Create database openclinica
CREATE DATABASE openclinica WITH ENCODING='UTF8' OWNER=clinica;
#To change the password of 'clinica' role
ALTER USER clinica WITH PASSWORD 'newpassword';
#Exit the psql command prompt by typing
#Exit the psql command prompt by typing
\q
5) Deploying OpenClinica within tomcat
#Create folder if it doesn't exist
mkdir -p /usr/local/oc/install

#Change to this folder:
cd /usr/local/oc/install

# Download the OpenClinica software from the OpenClinica
# website: https://community.openclinica.com/project/openclinica.
# To download the software, you need an OpenClinica community user account,
# which is free to create; you will be required to log in to the account to download the
# OpenClinica software.

#Run the following commands. In the commands, v.x is your version of OpenClinica:
unzip OpenClinica-v.x*
cd OpenClinica-v.x*/distribution
unzip OpenClinica.war -d OpenClinica
cp -rf OpenClinica* /usr/local/tomcat/webapps
6) Configure the Openclinica application
If you followed all the previous instructions exactly, there is only
one property in the configuration file, datainfo.properties, that you
may need to change in order for OpenClinica to start. There are other
properties in the configuration file you will probably want to modify
for your system.
The first time you install OpenClinica you will configure datainfo.properties here:
8) Go to http://{ubuntu-server-ip}:8080/OpenClinica/
default username : root
default password : 12345678
After creating a user the password is shown under alerts&messages left panel.
The first time you install OpenClinica you will configure datainfo.properties here:
/usr/local/tomcat/webapps/OpenClinica/WEB-INF/classes/datainfo.properties.
Consequent configuration changes SHOULD be made here /usr/local/tomcat/webapps/openclinica.config.- Open the configuration file: /usr/local/tomcat/webapps/OpenClinica/WEB-INF/classes/datainfo.properties
- Edit values for the properties in the datainfo.properties file. You must change the value for dbPass to the password you selected in Set Up the PostgreSQL Database. Change the values for any other properties, then save the file.
- Update the filePath parameter to the right value.
- Run the following commands:
#To set Tomcat to start automatically on system startup, run the following:
cp /usr/local/oc/install/OpenClinica-v.x*/install-docs/linux/tomcat /etc/init.d/
cd /etc/init.d
chmod a+x /etc/init.d/tomcat
#update the rc.d
update-rc.d tomcat defaults
service tomcat start
8) Go to http://{ubuntu-server-ip}:8080/OpenClinica/
default username : root
default password : 12345678
After creating a user the password is shown under alerts&messages left panel.
Friday, December 11, 2015
Setting static IP in ubuntu
Login as sudo user or root user
$# sudo vi /etc/network/interfaces
replace following two lines
auto eth0
iface eth0 inet dhcp
With
auto eth0
iface eth0 inet static
address 192.168.100.109
netmask 255.255.255.0
gateway 192.168.100.1
write and quit(:wq) from the vi editor.
restart machine to take effect. If needed modify /etc/resolv.conf for dns servers information.
$# sudo vi /etc/network/interfaces
replace following two lines
auto eth0
iface eth0 inet dhcp
With
auto eth0
iface eth0 inet static
address 192.168.100.109
netmask 255.255.255.0
gateway 192.168.100.1
write and quit(:wq) from the vi editor.
restart machine to take effect. If needed modify /etc/resolv.conf for dns servers information.
Wednesday, December 9, 2015
SFlow and Ganglia integration
For monitoring large clusters Ganglia is a robust open source tool. For a customer we have worked on the Ganglia.
We followed this blog to install Ganglia on ubuntu servers. This blog is also good one to start withGanglia contains three components.
1) gmetad
2) gmond
3) ganglia-webfront
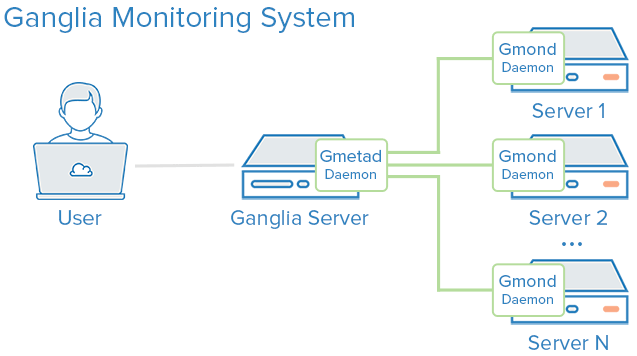
We have installed gmetad on ubuntu 14.04. The Ganglia version is 3.6.0.
In other versions of ubuntu systems like 13.04,12.04 and 11.04, we first updated the repositories by sudo apt-get update.
We faced some issues in updating 12.04 fresh os installation. We solved by replacing in.archive.ubuntu.com and security.ubuntu.com with oldreleases.ubuntu.com in /etc/apt/sources.list file.
after that we installed ganglia-monitor i.e., gmond by using sudo apt-get install ganglia-monitor.
The configuration changes are same as in the blog.
Time Synchronization is very important in these type of tools where master: slave or collector:sender type of installations.
It is essential that all hosts participating in the Ganglia monitoring system have a synchronized clock. Proactively deploying network time protocol (NTP) is highly recommended.
Due to the time issue we have seen this log in /var/log/syslog of gmond on ubuntu 12.04,13.04 and 11.04 servers.
/usr/sbin/gmetad[2782]:RRD_update (/var/lib/ganglia/rrds/...metric.rrd): illegal attempt to
update using time 1329950002 when last update time is 1329950002
(minimum one second step)
After that for more metrics we have integrated the Sflow with Ganglia.
For installing Sflow we followed this blog.
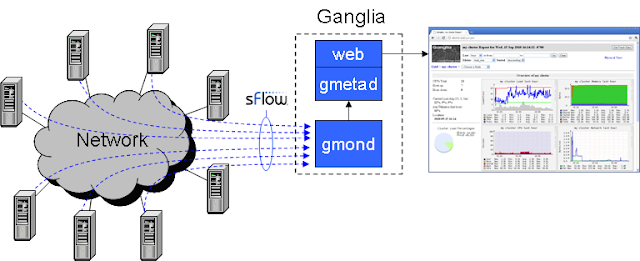
After installing Sflow we need to configure Sflow to send the metrics to gmond. we also need to configure gmond to receive metrics from the Sflow. There are two configurations we need to include in the gmetad server's gmond configuration file /etc/ganglia/gmond.conf. The configurations are
/* sFlow channel */
udp_recv_channel {
  port = 6343
}
sflow{
  accept_vm_metrics = yes
}
More about these configurations you can find below blog posts.
Ganglia-Sflow-VM-monitoring-Configuration
Ganglia-Configurations
Tuesday, December 8, 2015
VMware tools installation in ubuntu 11.10,12.10,14.04
Installing VMware tools on the VMware virtual machines is important.
I followed the blog post from VMware
VMware-Tools-Install
Some times while installing VMware tools in 11.10 you may get issues. For that before initiating installation of VMware tools from the VMware vsphere client, you need to select client device in device settings of the virtual machine
 After that you can initiate the VMware tools installation.
In the Virtualmachine console
step1
$# sudo mkdir /mnt/cdrom
$# sudo mount /dev/cdrom /mnt/cdrom
$# tar xzvf /mnt/cdrom/VMwareTools-x.x.x-xxxx.tar.gz -C /tmp/
$# cd /tmp/vmware-tools-distrib/
$# sudo ./vmware-install.pl -d
Then reboot the virtualmachine
Now you can see the vmware tools running in the vsphere client.
I followed the blog post from VMware
VMware-Tools-Install
Some times while installing VMware tools in 11.10 you may get issues. For that before initiating installation of VMware tools from the VMware vsphere client, you need to select client device in device settings of the virtual machine

In the Virtualmachine console
step1
$# sudo mkdir /mnt/cdrom
$# sudo mount /dev/cdrom /mnt/cdrom
$# tar xzvf /mnt/cdrom/VMwareTools-x.x.x-xxxx.tar.gz -C /tmp/
$# cd /tmp/vmware-tools-distrib/
$# sudo ./vmware-install.pl -d
Then reboot the virtualmachine
Now you can see the vmware tools running in the vsphere client.
Thursday, November 26, 2015
VMware vfabric web servers and tc servers to start when system boot
It is very important to start the tomcat services when a virtual machine power on automatically.
I have worked on this for our application to start up when ever there is a power on. On the VMware esxi host we can add a virtual machine to power on automatically when host restarts.
After starting the virtual machine the tomcat service in the server was not starting in our case. So, I followed VMware documentations and listed the important commands to do the same task here.
The following are the steps to make the tomcat or web services to start automatically when a virtual machine starts.
We need to create a tomcat user with sudo permissions
adduser tcserver sudo
Make him owner for all files and sub directories of CATALINA_HOME
Edit
CATALINA_HOME/bin/init.d.sh
Modiy
TC_RUNTIME_USER="tc-server" to TC_RUNTIME_USER="tcserver"
Link the init.d.sh to /etc/init.d/{servicename}
ln -s /var/opt/vmware/vfabric-tc-server-standard/tcserver/bin/init.d.sh \ /etc/init.d/tcserver
After that we can test the service is working or not just by
Note : CATALINA_HOME = /var/opt/vmware/vfabric-tc-server-standard/MyInstance/
For webservers I just made the link and updated the rc.d and it just works fine.
# ln -s /var/opt/vmware/vfabric-web-server/webserver/bin/httpdcl /etc/init.d/webserver
# update-rc.d webserver defaults
I have worked on this for our application to start up when ever there is a power on. On the VMware esxi host we can add a virtual machine to power on automatically when host restarts.
After starting the virtual machine the tomcat service in the server was not starting in our case. So, I followed VMware documentations and listed the important commands to do the same task here.
The following are the steps to make the tomcat or web services to start automatically when a virtual machine starts.
We need to create a tomcat user with sudo permissions
adduser tcserver sudo
Make him owner for all files and sub directories of CATALINA_HOME
Edit
CATALINA_HOME/bin/init.d.sh
Modiy
TC_RUNTIME_USER="tc-server" to TC_RUNTIME_USER="tcserver"
Link the init.d.sh to /etc/init.d/{servicename}
ln -s /var/opt/vmware/vfabric-tc-server-standard/tcserver/bin/init.d.sh \ /etc/init.d/tcserver
After that we can test the service is working or not just by
To start the server instance
/etc/init.d/tcserver start
To get status the server instance
/etc/init.d/tcserver status
To restart the server instance
/etc/init.d/tcserver restart
To staop the server instance
/etc/init.d/tcserver stop
This is important after above to start the instance on boot we need to update the rc.d add the service instance to defaults
update-rc.d webserver defaults
For webservers I just made the link and updated the rc.d and it just works fine.
# ln -s /var/opt/vmware/vfabric-web-server/webserver/bin/httpdcl /etc/init.d/webserver
# update-rc.d webserver defaults
Wednesday, November 25, 2015
How to ReadMessages from usb modem using sms-lib in ubuntu system
This week I worked on Reading messages from USB modem with the help of smslib library.
The prerequisites
1) USB modem details
Manufacturer: ZTE CORPORATION
Model: MF190
2) SIM : Tata docomo
3) Ubuntu i386 laptop
For windows users you can follow this blog
http://gsmmodemtutoialbysamyan.blogspot.in/2013/12/what-is-gsm-modem-gsm-modem-specialized.html?showComment=1448442361213
The process I am sharing is similar to the process mentioned in above blog
The only change is 2nd step
In Linux environments we need to copy "libLinuxSerialParallel.so" to jdk/bin and jre/bin
This file you can find in java comm api of oracle, file is "comm3.0_linux.zip"
Change the javax.comm.properties in my case the paths are
# Paths to server-side serial port devices
serpath0 = /dev/ttyUSB2
serpath1 = /dev/ttyUSB1
Then after the steps are similar add smslib.jar and log4j.jar to your project and Run ReadMessages.java
While running the ReadMessages.java you may get stringindexoutofboundsexception it can be solved by setting actual message storage location i.e., either SM or SR or ME or MD.
In my case it is ME
this is the method to be used in smslib to set the storage location
gateway.getATHandler().setStorageLocations("ME");
The total files can be found in this link
https://dl.dropboxusercontent.com/u/87378162/SMSlib-requiredfiles.tar.gz
The java project I implemented can be downloaded from here
https://dl.dropboxusercontent.com/u/87378162/USBModem.zip
The prerequisites
1) USB modem details
Manufacturer: ZTE CORPORATION
Model: MF190
2) SIM : Tata docomo
3) Ubuntu i386 laptop
For windows users you can follow this blog
http://gsmmodemtutoialbysamyan.blogspot.in/2013/12/what-is-gsm-modem-gsm-modem-specialized.html?showComment=1448442361213
The process I am sharing is similar to the process mentioned in above blog
The only change is 2nd step
In Linux environments we need to copy "libLinuxSerialParallel.so" to jdk/bin and jre/bin
This file you can find in java comm api of oracle, file is "comm3.0_linux.zip"
Change the javax.comm.properties in my case the paths are
# Paths to server-side serial port devices
serpath0 = /dev/ttyUSB2
serpath1 = /dev/ttyUSB1
Then after the steps are similar add smslib.jar and log4j.jar to your project and Run ReadMessages.java
While running the ReadMessages.java you may get stringindexoutofboundsexception it can be solved by setting actual message storage location i.e., either SM or SR or ME or MD.
In my case it is ME
this is the method to be used in smslib to set the storage location
gateway.getATHandler().setStorageLocations("ME");
The total files can be found in this link
https://dl.dropboxusercontent.com/u/87378162/SMSlib-requiredfiles.tar.gz
The java project I implemented can be downloaded from here
https://dl.dropboxusercontent.com/u/87378162/USBModem.zip
Thursday, November 19, 2015
Providing two Way authentication for VMware Horizon view server with freeradius and google authenticator
This week I worked on the 2 way authentication for vmware horizon view server by following the document
http://blogs.vmware.com/consulting/files/2015/02/VMW_15Q1_TD_Horizon-View-Google-Authenticator_021715_FINAL_EMonjoin.pdf
shared by
I followed the document thoroughly one small change in the installation step is currently likewise-open is not available from the repos. We need to install pbis
for that I followed below url
http://askubuntu.com/questions/452904/likewise-open-14-04-other-easy-way-to-connect-ad
for some configuration settings some resources helped me I want to share them here
https://community.spiceworks.com/how_to/80336-join-ubuntu-14-04lts-to-a-windows-domain-using-pbis-open
http://blogs.vmware.com/consulting/files/2015/02/VMW_15Q1_TD_Horizon-View-Google-Authenticator_021715_FINAL_EMonjoin.pdf
shared by
I followed the document thoroughly one small change in the installation step is currently likewise-open is not available from the repos. We need to install pbis
for that I followed below url
http://askubuntu.com/questions/452904/likewise-open-14-04-other-easy-way-to-connect-ad
for some configuration settings some resources helped me I want to share them here
https://community.spiceworks.com/how_to/80336-join-ubuntu-14-04lts-to-a-windows-domain-using-pbis-open
Thursday, October 29, 2015
Alfresco Replacing default certificates and handling expiry
Alfresco logs shows following log if the certificates expire
javax.net.ssl.SSLHandshakeException: sun.security.validator.ValidatorException: PKIX path validation failed: java.security.cert.CertPathValidatorException: timestamp check failed
To update the certificates follow the below steps
The $ALFRESCO_SOURCE_HOME/ is
https://svn.alfresco.com/repos/alfresco-open-mirror/alfresco/HEAD/root/
1. Backup the current keystore directory in alf_data
2. Remove the keystore directory from alf_data
3. Copy the keystore directory from Alfresco SVN $ALFRESCO_SOURCE_HOME/projects/repository/config/alfresco/keystore to alf_data
4. Remove the keystore directory from $TOMCAT_HOME/webapps/alfresco/WEB-INF/classes/alfresco
5. Copy the keystore directory from Alfresco SVN $ALFRESCO_SOURCE_HOME/projects/repository/config/alfresco/keystore to $TOMCAT_HOME/webapps/alfresco/WEB-INF/classes/alfresco
6. Copy...
$ALFRESCO_SOURCE_HOME/projects/solr/source/solr/instance/archive-SpacesStore/conf/ssl.repo.client.keystore to alf_data/solr/archive-SpacesStore/conf/ssl.repo.client.keystore
$ALFRESCO_SOURCE_HOME/projects/solr/source/solr/instance/archive-SpacesStore/conf/ssl.repo.client.truststore to alf_data/solr/archive-SpacesStore/conf/ssl.repo.client.truststore
$ALFRESCO_SOURCE_HOME/projects/solr/source/solr/instance/workspace-SpacesStore/conf/ssl.repo.client.keystore to alf_data/solr/workspace-SpacesStore/conf/ssl.repo.client.keystore
$ALFRESCO_SOURCE_HOME/projects/solr/source/solr/instance/workspace-SpacesStore/conf/ssl.repo.client.truststore to alf_data/solr/workspace-SpacesStore/conf/ssl.repo.client.truststore
Steps copied from https://wiki.alfresco.com/wiki/Replacing_Default_Certificate
Wednesday, October 28, 2015
Reset admin password in Alfresco 4.0.d
Reset admin password in Alfresco 4.0.d
Case1 : If you know the password of other user with admin role you can change directly by logging into the alfresco site
Case1 : Change admin password in postgres database
Login to alfresco instance and change directory to /opt/alfresco-4.0.d/postgresql/bin
# ./psql -U postgres
Password for user postgres:
postgres=#
To List databases
postgres=# \l
List of databases
Name | Owner | Encoding | Collation | Ctype | Access privileges
-----------+----------+----------+-------------+-------------+------------------------------------------------------
Connect to alfresco database
postgres=# \connect alfresco;
You are now connected to database "alfresco".
alfresco-#
Display tables
alfresco-# \dt
To list users and their passwords
node_id | qname_id | hash_pass | user_string
---------+----------+----------------------------------+-------------
555 | 10 | 0eeb8b5ee6e96f1a8443edfb1dfc36ad | mjackson
4 | 10 | 50d4e7a47cf4a836e51cdbc335cb6f44 | admin
In alfresco passwords are stored as encrypted.
UPDATE 1
Queries copied from
Case1 : If you know the password of other user with admin role you can change directly by logging into the alfresco site
Case1 : Change admin password in postgres database
Login to alfresco instance and change directory to /opt/alfresco-4.0.d/postgresql/bin
# ./psql -U postgres
Password for user postgres:
postgres=#
To List databases
postgres=# \l
List of databases
Name | Owner | Encoding | Collation | Ctype | Access privileges
-----------+----------+----------+-------------+-------------+------------------------------------------------------
Connect to alfresco database
postgres=# \connect alfresco;
You are now connected to database "alfresco".
alfresco-#
Display tables
alfresco-# \dt
To list users and their passwords
alfresco-# SELECT anp1.node_id, anp1.qname_id, anp1.string_value as hash_pass, anp2.string_value as user_stringFROM alf_node_properties anp1 INNER JOIN alf_qname aq1 ON aq1.id = anp1.qname_id INNER JOIN alf_node_properties anp2 ON anp2.node_id = anp1.node_id INNER JOIN alf_qname aq2 ON aq2.id = anp2.qname_idWHERE aq1.local_name = 'password'AND aq2.local_name = 'username';node_id | qname_id | hash_pass | user_string
---------+----------+----------------------------------+-------------
555 | 10 | 0eeb8b5ee6e96f1a8443edfb1dfc36ad | mjackson
4 | 10 | 50d4e7a47cf4a836e51cdbc335cb6f44 | admin
In alfresco passwords are stored as encrypted.
For 'admin' string the encrypted one is
Reset the password to admin and login to alfresco web and change password.209c6174da490caeb422f3fa5a7ae634 so we alfresco-# UPDATE alf_node_properties SET string_value='209c6174da490caeb422f3fa5a7ae634' WHERE node_id=4 and qname_id=10Queries copied from
http://keytocontent.blogspot.in/2011/09/resetting-forgotten-alfresco-admin.html
SSL certificate import
Import SSL certificate to particular keystore
C:\Users\veeresh\Desktop\>keytool -import -alias xmpp3 -keypass changeit -keystore c:\Java\jdk1.8.0_20\jre\lib\security\cacerts -file c:\Users\veeresh\Desktop\vamanit.cloudapp.net.pem
List certificates in a keystore
C:\Users\veeresh\Desktop\>keytool -list -keystore cacerts
Generate .pem or .cer files for self signed websites using openssl
openssl s_client -connect vamanit.webiste.net:5222 < /dev/null | sed -ne '/-BEGIN CERTIFICATE-/,/-END CERTIFICATE-/p' > xmpp.crt
C:\Users\veeresh\Desktop\>keytool -import -alias xmpp3 -keypass changeit -keystore c:\Java\jdk1.8.0_20\jre\lib\security\cacerts -file c:\Users\veeresh\Desktop\vamanit.cloudapp.net.pem
List certificates in a keystore
C:\Users\veeresh\Desktop\>keytool -list -keystore cacerts
Generate .pem or .cer files for self signed websites using openssl
openssl s_client -connect vamanit.webiste.net:5222 < /dev/null | sed -ne '/-BEGIN CERTIFICATE-/,/-END CERTIFICATE-/p' > xmpp.crt
Subscribe to:
Posts (Atom)